Connectors in Splashtop Secure Workspace enable integration with external systems or services, enhancing the capabilities of the platform. Follow the steps below to deploy a connector.
Step 1: Accessing the Deployment Section
- Log in to your Splashtop Secure Workspace super admin account or org admin account using your credentials.
- Once logged in, navigate to the Deployment menu and select Connector.
Step 2: Adding a Connector
- In the Connector section, locate the Add Connector button.
- Click on the button to initiate the connector deployment process.
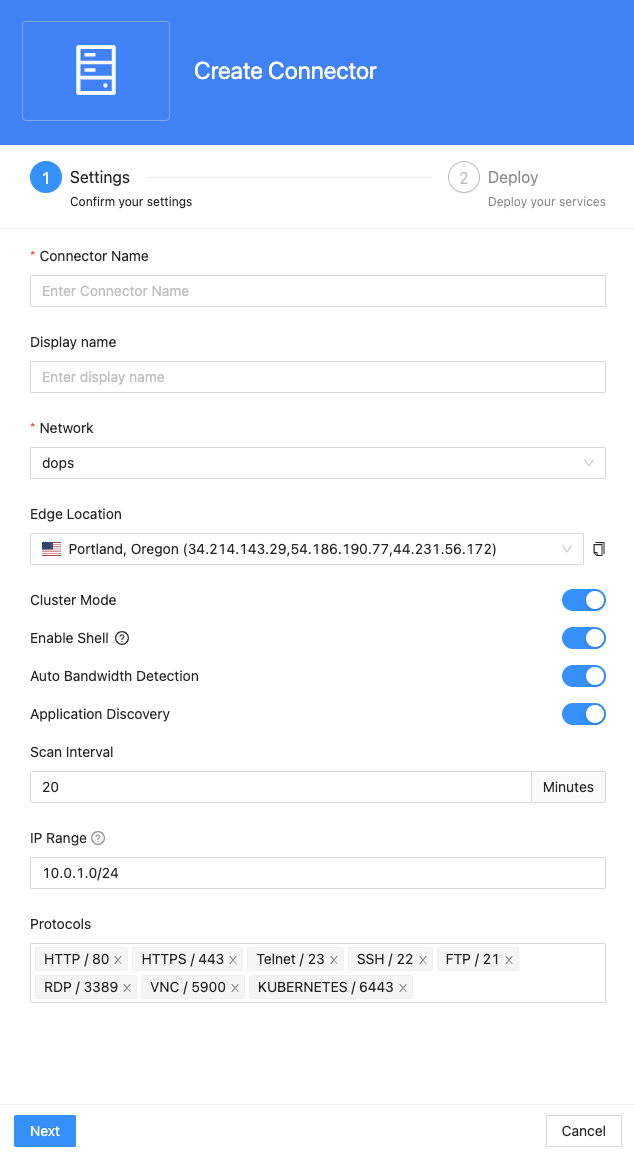
Step 3: Deployment
-
You will need to provide the following details for the connector:
-
Connector Name: Enter a unique name for the connector.
-
Display Name: Optionally, provide a display name for the connector.
-
Network: Select the appropriate network for the connector. You can manage Network here Network Configuration
-
Edge Location: Specify the desired edge location for the connector.
-
Cluster Mode: Enable this option if you want the connector to run in cluster mode, allowing multiple connector instances for high availability.
-
Enable Shell: Toggle this switch to add a Connector Shell action to the deployed connector. This allows you to run a command line interface (shell) on the host where the connector is deployed, with the credentials of the user who deployed it.
Note: This feature is not available for connectors deployed on Windows.
-
Auto Bandwidth Detection: Choose whether to enable or disable auto bandwidth detection for the connector.
-
Application Discovery:
- Scan Interval (in minutes): Specify the interval at which application discovery scans should be performed.
- IP range: Define the IP range using CIDR format (e.g., 192.168.20.0/24), IP range format (e.g., 192.168.20.0-192.168.20.100), or static IP format (e.g., 192.168.20.0) separated by commas.
- Protocols: Select from the system's built-in protocols (e.g., DNS/53, HTTP/80), or provide specific ports to scan separated by commas.
-
-
Select a Deployment Method
- Using the CLI commands for your specific environment (OS, Kubernetes, or Docker), execute the necessary commands to install and run the connector.
- If you want to deploy the connector directly on your operating system, please select one of the following tabs based on your OS (Windows, macOS, Linux), then copy the corresponding command line and execute it on your OS.
- Alternatively, you can choose to deploy your connector using Docker. Copy the command line from the Docker tab and execute it on a host with Docker installed.
- We also provide an option to deploy the connector on Kubernetes using Helm. You can find the corresponding command line in the Helm tab.
- In the CLI tab, we provide command lines to run the connector as a service daemon for Windows, macOS, and Linux.
- Using the CLI commands for your specific environment (OS, Kubernetes, or Docker), execute the necessary commands to install and run the connector.
-
Once the CLI commands are executed, the web page will display the status of the connector deployment. If cluster mode is enabled, you will be able to add up to 5 instances for the connector cluster.
Step 4: Completion and Verification
Once the connector deployment process is complete, you can verify its successful installation and functionality. Ensure that the connector appears in the list of deployed connectors within the Splashtop Secure Workspace Connector section.