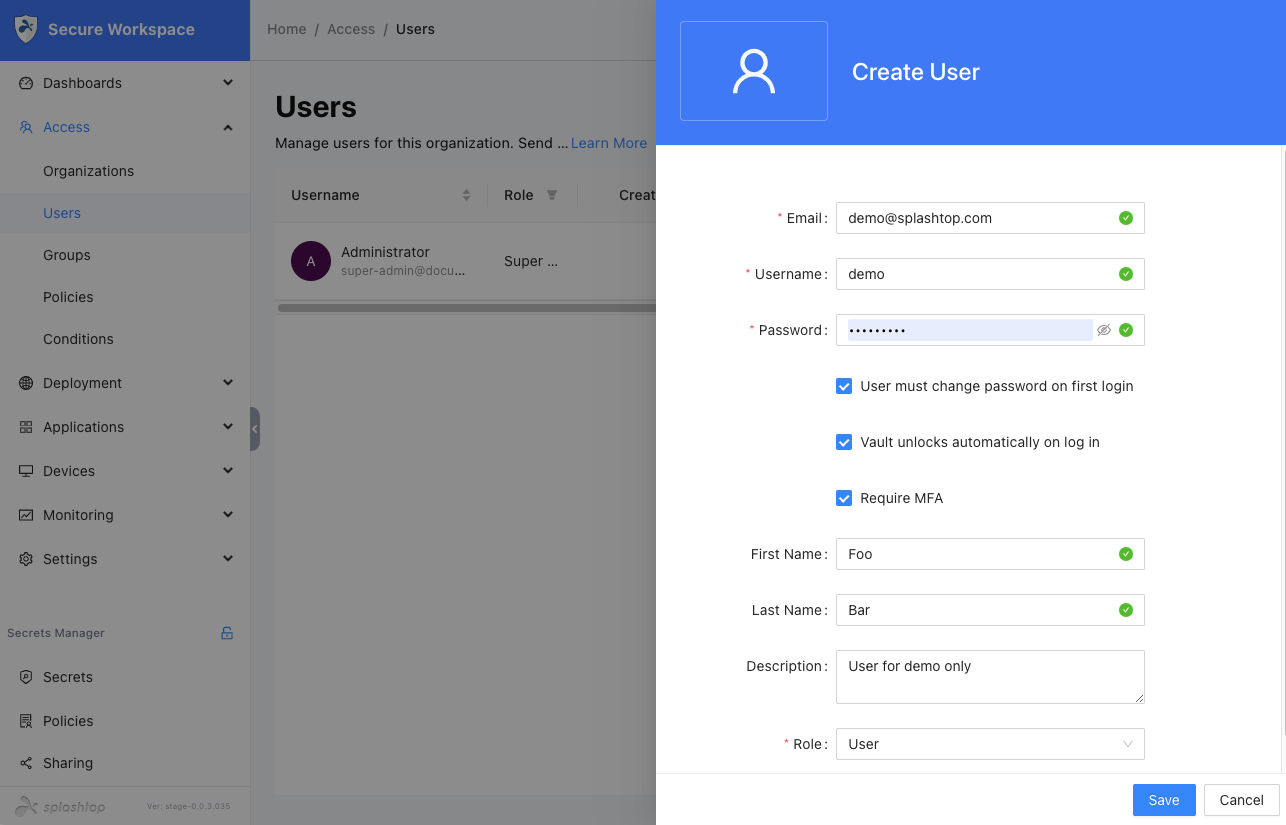
Adding a new user to Splashtop Secure Workspace allows individuals to access and utilize the platform's features. There are two methods available for adding users: manual creation and invitation via email. Follow the steps below for each method.
Method 1: Manual Creation
Step 1: Access User Management
- Log in to your Splashtop Secure Workspace super admin account or org admin account using your credentials.
- Once logged in, navigate to the Access menu and select Users.
Step 2: Add a New User
- On the Users page, locate the Add Users button.
- Click on the Add User button to proceed.
- Fill in the required information:
- Email: Provide a valid email address for the user.
- Username: The login ID for the user
- Password: Set a secure password for the user's account.
- User must change password on first login: Select this option if the user should be prompted to change their password during their first login.
- Vault unlocks automatically on log in: Enable this option if the user's vault should be automatically unlocked upon logging in.
- Require MFA (Multi-Factor Authentication): Enable this option if the user should be required to use multi-factor authentication for enhanced security.
- First Name: Enter the user's first name.
- Last Name: Enter the user's last name.
- Role: Choose the appropriate role for the user from the available options: Super Admin, Auditor, Org Admin, Manager, Analyzer, User.

Step 3: Sharing Username and Password
- After creating the user account, you need to share the username and password with the user.
- Inform the user about their account creation and provide them with the following details:
- Username: Provide the username associated with the user's account.
- Password: Share the password set during the account creation process.
- Instruct the user to use the provided username and password to log in to Splashtop Secure Workspace.
Step 4: Editing User Details
- After creating the user account, you can edit the user's details if needed.
- Select the user from the user list and click on their name or the Edit button.
- Modify the available fields as necessary, such as changing the email, first name, last name, display name, description or role.
- Review the changes made and click the Save button to apply the modifications.
Method 2: Invite Users via Email
Step 1: Access User Management
- Log in to your Splashtop Secure Workspace super admin account using your credentials.
- Once logged in, navigate to the Access menu and select Users.
Step 2: Invite a New User
- On the Users page, locate the Invite Users button.
- Click on the Invite Users button to proceed.
- Provide the user's email address in the designated field.
- Choose an email template from the available options. The email sent to the user will reflect the chosen template.
- Configure the following options:
- Require MFA (Multi-Factor Authentication): Enable this option if the user should be required to use multi-factor authentication for enhanced security.
- Vault unlocks automatically on log in: Enable this option if the user's vault should be automatically unlocked upon logging in.
- Role: Choose the appropriate role for the user from the available options: Super Admin, Auditor, Org Admin, Manager, Analyzer, User.
- Review the entered information for accuracy.
- Click the Invite button to send the email invitation to the user.
Step 3: User Re-invite
- If desired, click the Re-invite button to send an email invitation to the user.
- The user will receive an email with instructions on how to activate their account.
- Instruct the user to follow the provided instructions to activate their account and set up their password.
Step 4: User Activation
- The user will receive an email invitation containing instructions to activate their account.
- Instruct the user to check their email and follow the instructions provided.
- Once the user activates their account, they can set up their password and access the Splashtop Secure Workspace.
Step 5: Editing User Details
- After creating the user account, you can edit the user's details if needed.
- Select the user from the user list and click on their name or the Edit button.
- Modify the available fields as necessary, such as changing the email, first name, last name, display name, description or role.
- Review the changes made and click the Save button to apply the modifications.