Directory User Sync is a user and password management tool that allows you to sync user accounts and passwords from platforms like Microsoft Active Directory, Microsoft Entra ID, Okta, and (coming soon) Google Workspace to the SSW Vault, either on a scheduled or on-demand basis. The synced user credentials are stored as secrets in SSW, making them convenient for use in other scenarios, such as Dynamic credentials (DA).
IT Admin Preparation: Deploy Connectors and Set Permissions
Before initiating Active Directory synchronization, IT Admins need to undertake two key preparatory steps within the organization's private network or cloud environment:
- Deploy Connectors: Follow the detailed instructions provided in the Deploy Connectors Guide to deploy connectors. This guide outlines the process of setting up connectors which are crucial for facilitating secure communication between the Secure Workspace and your internal network.
- Enhanced Privileges for Connector Operation: To ensure smooth Active Directory synchronization, especially when deploying the connector on a non-domain controller machine, here are detailed requirements for the permissions and settings of the connector server logon user:
- Deployment Location: The connector can be deployed on a non-domain controller machine. This offers greater flexibility in system architecture and possibilities for distributed management.
- Server Logon User Settings:
- Domain Member User: Ensure that the server logon user is a member of the domain. This is crucial for proper communication with Active Directory and execution of required operations.
- Member of the Account Operator Group: Set the server logon user as a member of the Account Operator group. This step is key because members of the Account Operator group typically have the permissions needed to modify Active Directory user passwords, which is vital for the synchronization process.
- Local Administrator Privileges: It's recommended to set the server logon user as a local administrator (local admin) of the machine running the connector. This ensures that the user has sufficient privileges to start services and write logs, ensuring effective operation and troubleshooting capabilities of the connector.
Below are the details for using Microsoft Active Directory, Microsoft Entra ID, and Okta sync types:
Microsoft Active Directory
Microsoft Active Directory sync relies on a connector. To use this feature, you must install the SSW Connector on a machine within the Windows AD domain. This machine should log on to the service with an account that has read/write user permissions and account management privileges.
Microsoft Active Directory supports two modes:
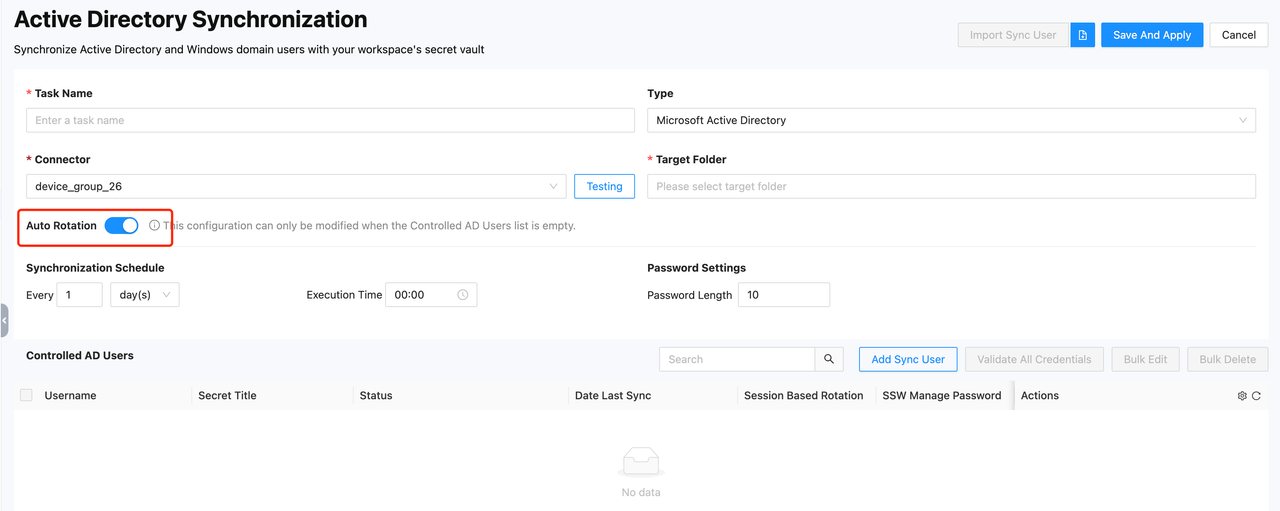
Auto Rotation Mode
-
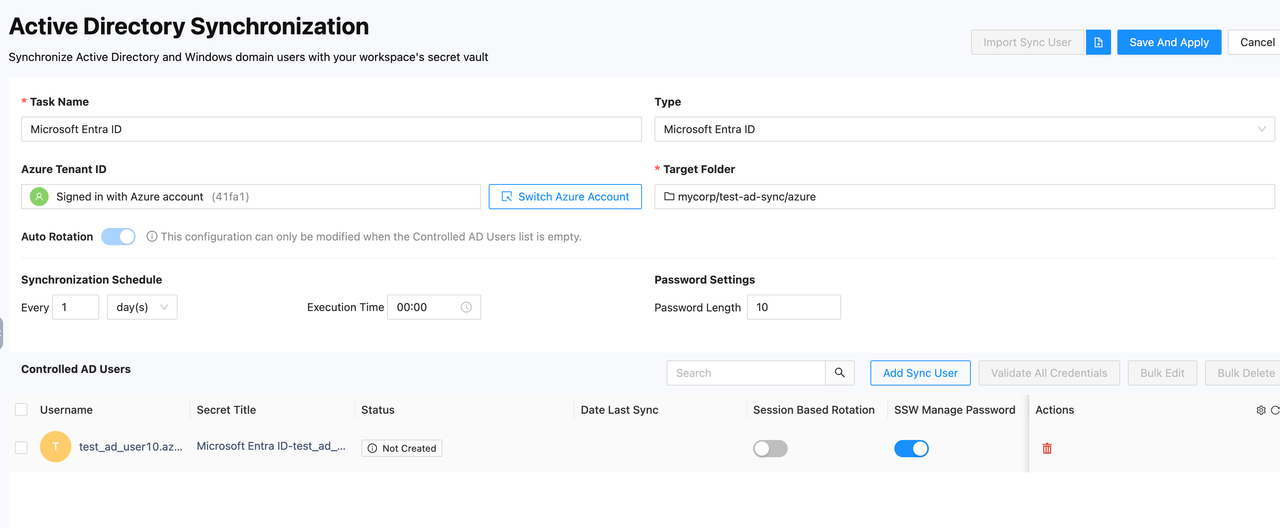
Navigate to the Add Task page, select "Microsoft Active Directory" for the Type, choose the installed connector in the Connector field, use the Testing button to verify if the current connector is properly connected to the AD domain, select the target secret folder where the user will be saved in the Target Folder field, turn on the Auto Rotation switch (it is off by default), set the Synchronization Schedule to configure the execution time at hourly or daily intervals, and define the password length in Password Settings to meet the domain's password policy requirements.
-
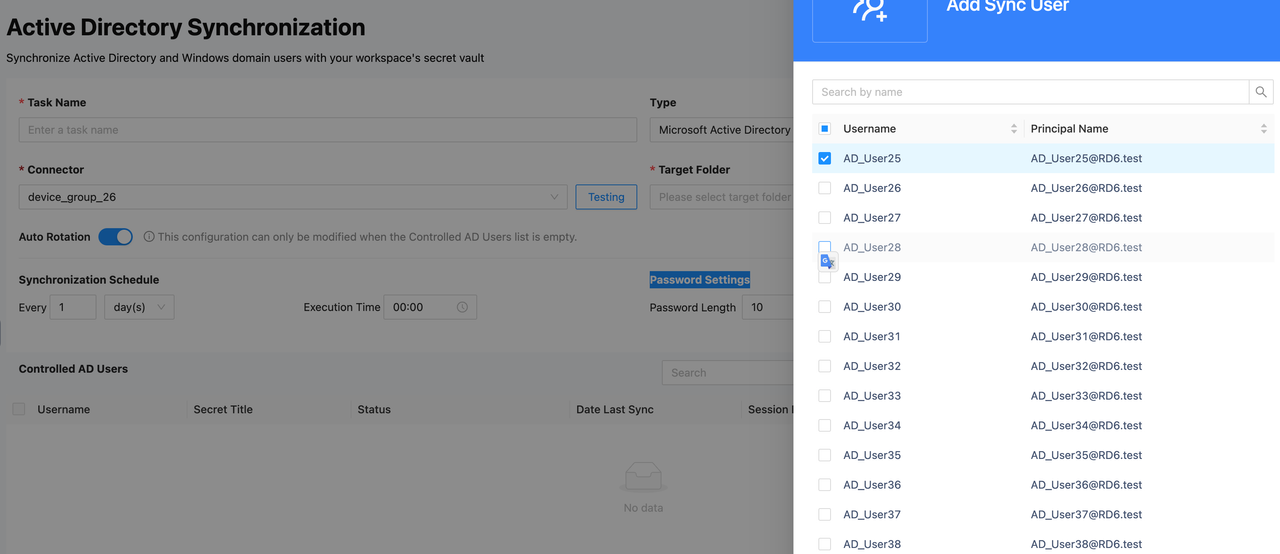
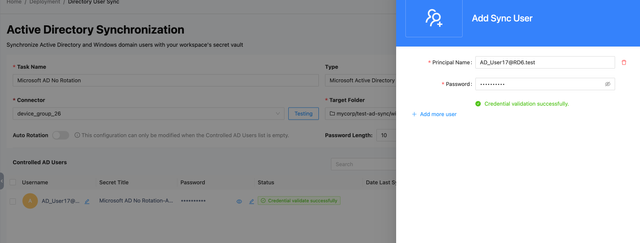
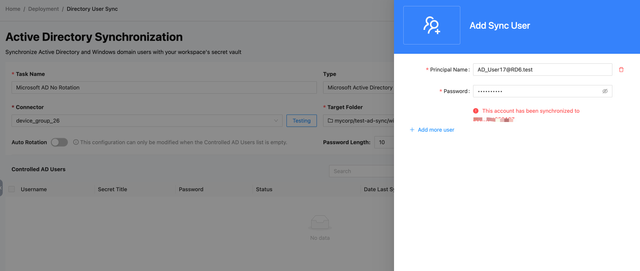
Click Add Sync User to select a user. To ensure the user's account password functions correctly, make sure each user is assigned to only one Sync task and is not used in multiple tasks. In the Add Sync User interface, you can also search for users by username. Once you have selected the account to sync, click the Add button at the bottom right of the page to move it to the candidate state.
-
After selecting the user, you can configure Session Based Rotation and SSW Manage Password:
- Session Based Rotation: This switch is off by default. When turned on, the user will automatically rotate after logging into the SSW application as a DA and then closing the application or when the application's session is killed.
- SSW Manage Password: This switch is on by default. It allows SSW to manage the user's corresponding secret password (for more details, refer to the description of button 4 in step 4).
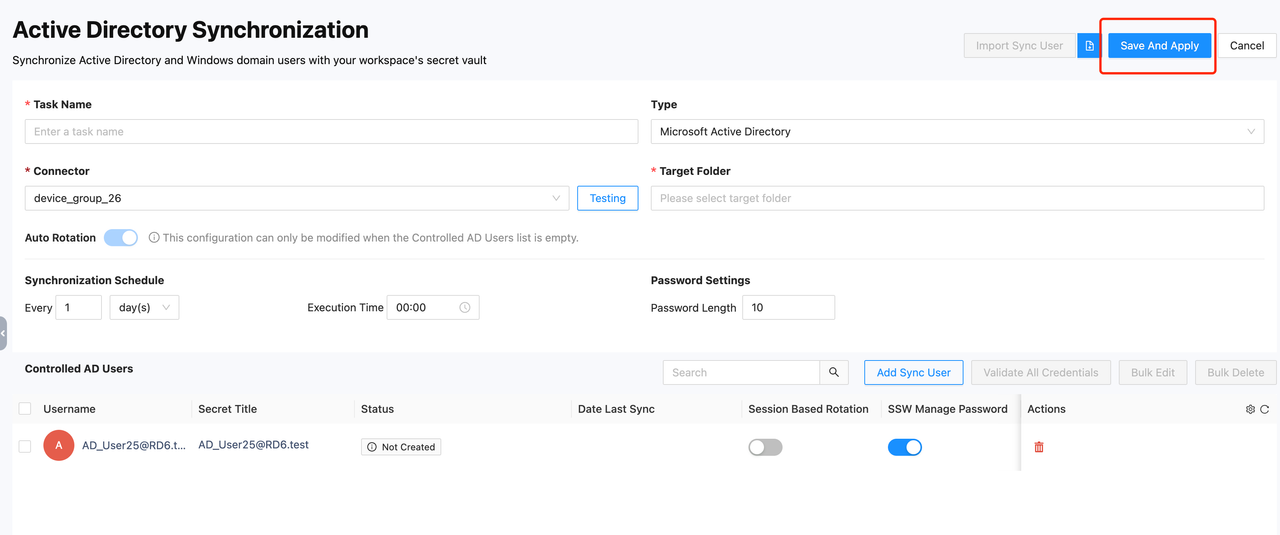
Once everything is set up, click Save And Apply to create a sync task.
-
After setting up a sync task, the task interface will appear as shown in the image below. Here is a description of each button and its usage:
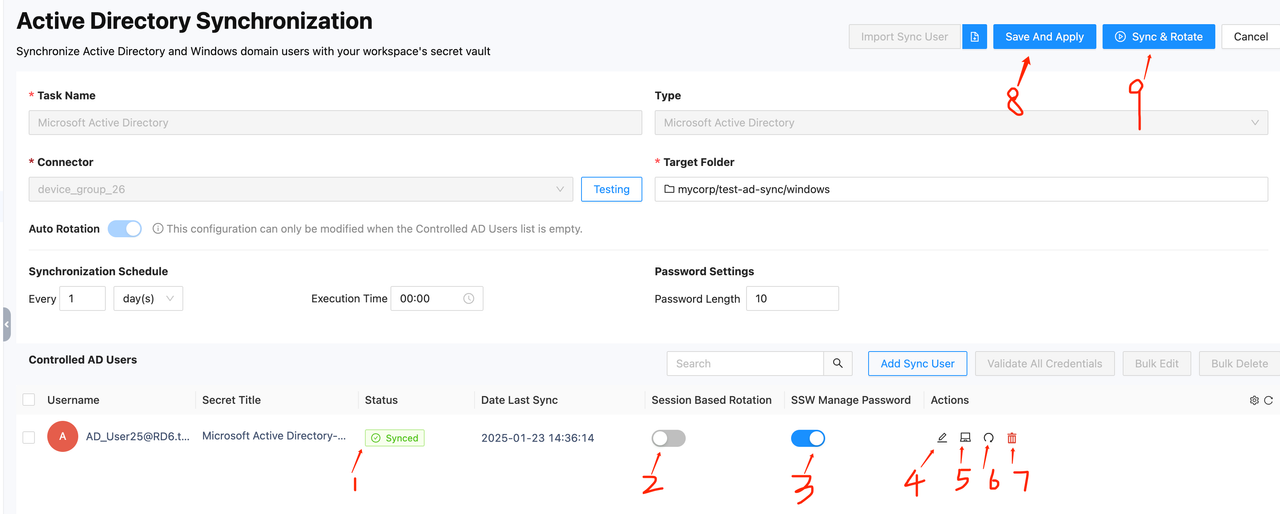
- Button 1: Status - Displays the current sync status of the user. If an error occurs, an error message will be shown.
- Button 2: Session Based Rotation Switch - This switch is off by default. Clicking it will change its state and take effect immediately.
- Button 3: SSW Manage Password Switch - This switch is off by default. Clicking it will change its state and take effect immediately.
- Button 4: Edit Secret in Vault Page - When the SSW Manage Password switch is on, the password cannot be edited or viewed. It can only be viewed after checkout. During checkout, the password status changes from checkout to checkin. You need to select the checkout time, during which the secret cannot be used by other users. When the checkout time expires or the password is rotated automatically or manually, the password's checkout status will reset. Users can also manually change the password status from checkin to checkout, which will trigger a password rotation.
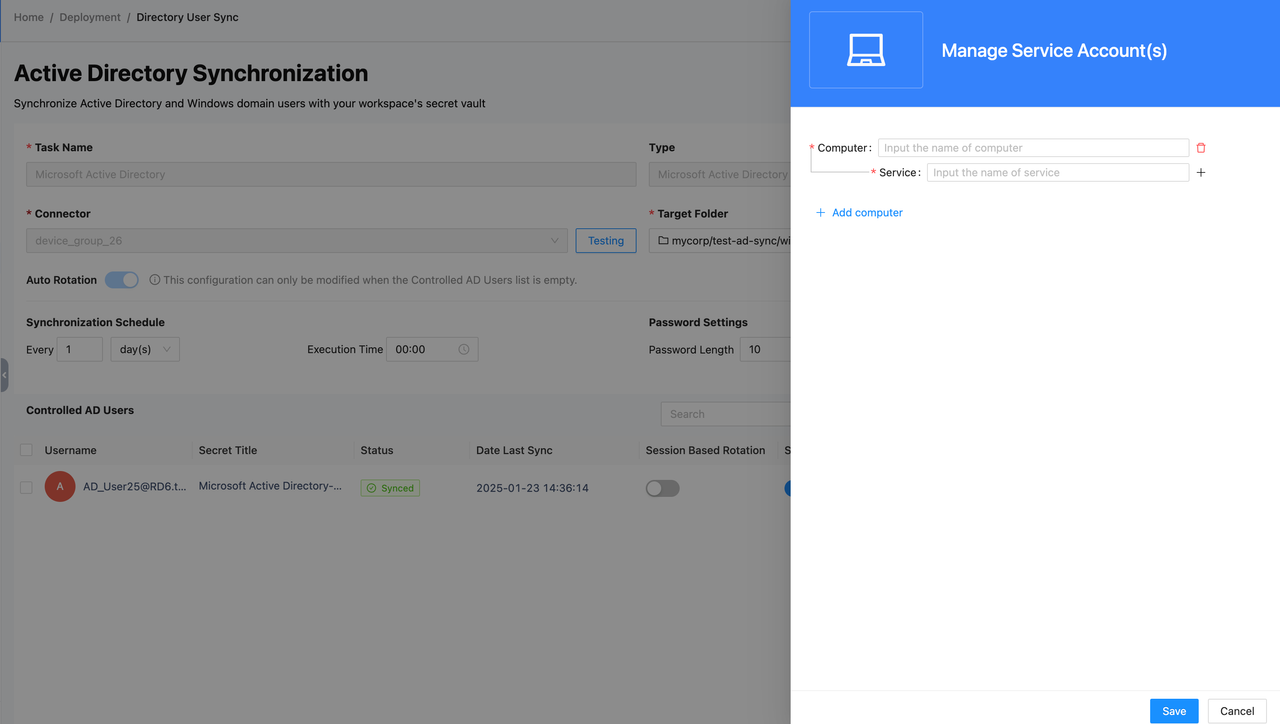
- Button 5: Manage Service Account(s) - When the current user is used as the logon account for a Windows service, the service needs to re-logon and restart after the password changes. On this page, you can set the device names and service names that need to auto-logon and restart. After setting, the system will automatically check if the entered information is valid, so please ensure the correct device and service information is entered. When the password rotates, this setting will automatically configure the service's logon account for you. Additionally, you can configure this feature locally on the device with the installed connector via a file.
- Button 6: Sync & Rotate - Manually rotate the selected user.
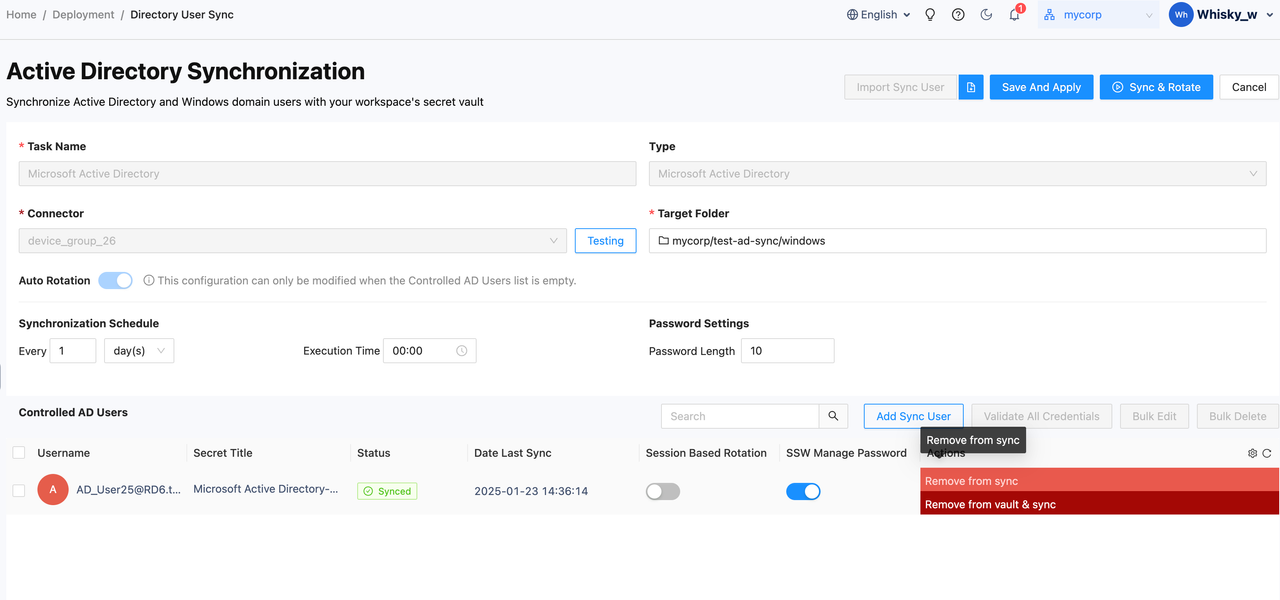
- Button 7: Remove User - Remove the current user with two options:
- Remove from Sync: Only removes the user from the task. The user will not be rotated in the next execution and will be released, making them available for other sync tasks.
- Remove from Vault & Sync: Deletes the user's corresponding vault secret along with the user from the task.
- Button 8: Save And Apply - Manually update and save changes. When changes are made on the sync page, you need to save them manually.
- Button 9: Sync & Rotate - Manually execute the current task. All user passwords under this task will be rotated.
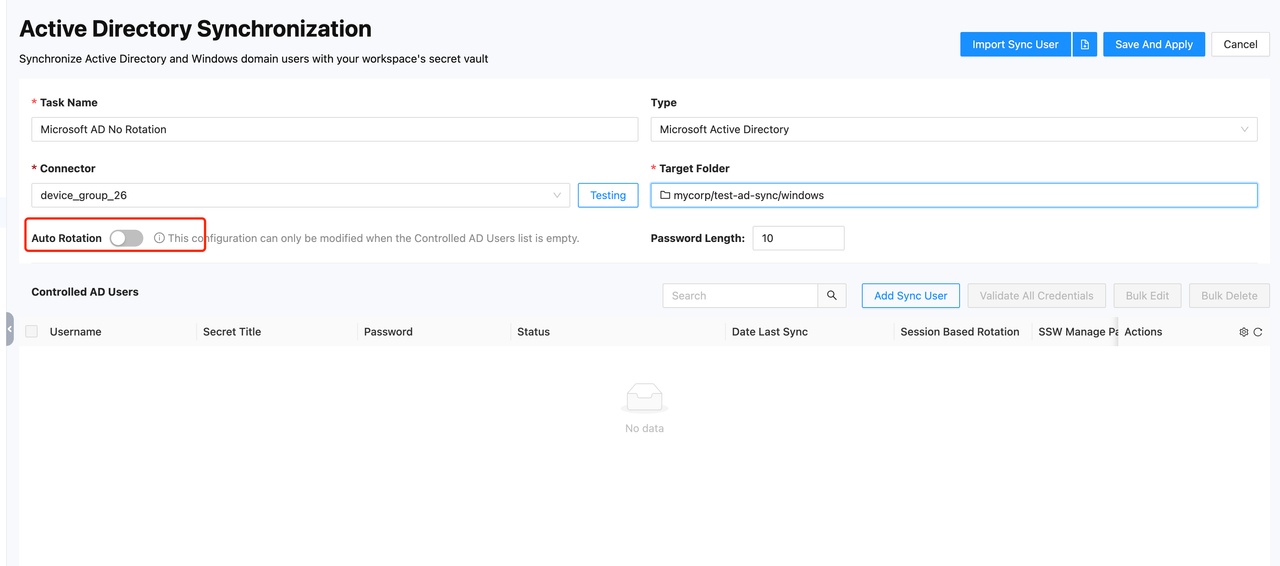
NO Rotation
For NO Rotation, the admin needs to manually input the user account passwords to be synced into SSW, either manually or via a file. Without manual rotation, the user's password will not change.
-
Turn off the Auto Rotation switch (it is off by default). Click the Add Sync User button to enter the user addition page.
-
To add a sync user, the admin needs to manually input the user's account and password information. Then, click the Add button at the bottom right of the page to save. The system will verify the validity of the entered user account and password, and check if the user is already being used by another sync task.
- After adding the user, the page will look like this:
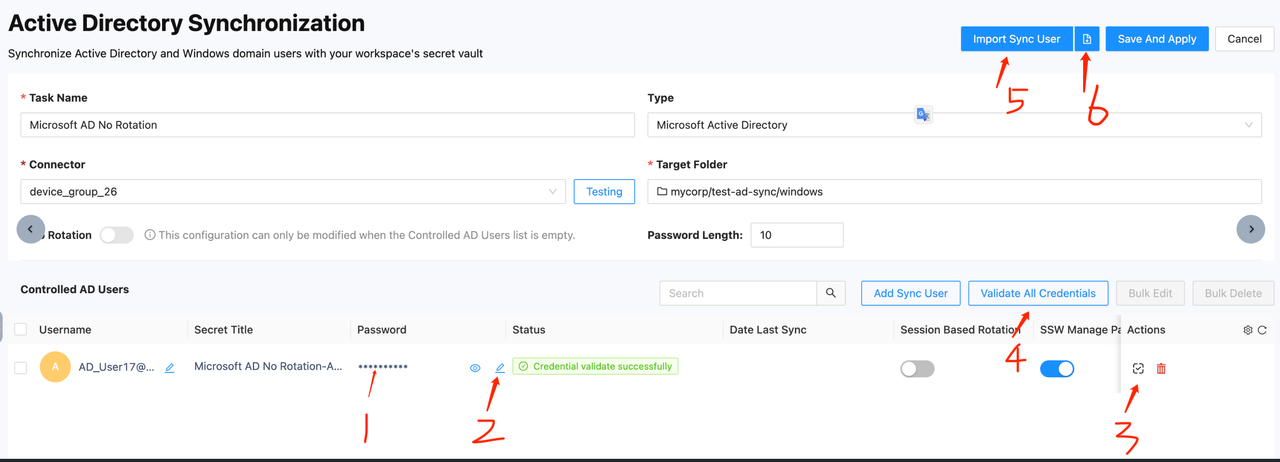
- Button 1 User Password: The position indicated by 1 is the user's password.
- Button 2 Edit Password: Allows you to edit the password.
- Button 3 Validate This Credential: Checks if the current user and password are valid.
- Button 4 Validate All Credentials: Checks if all added user credentials are valid.
- Button 5 Import Sync User: Admins can place the user account passwords to be synced in a CSV file. The first row of the CSV file is the header and should not be changed. Start entering the username and password from the second row. After importing, the users will appear in the Controlled AD Users list. You can also manually validate their validity using button 3.
- Click Save And Apply to save your changes. During the save process, the system will re-validate the validity of all credentials.
Microsoft Entra ID
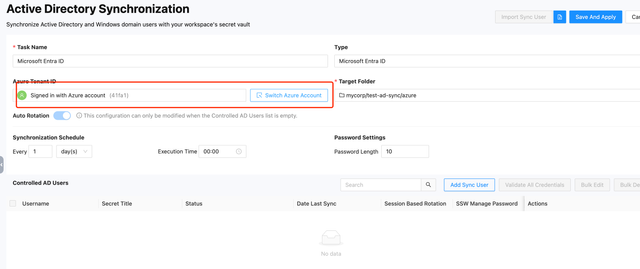
For Microsoft Entra ID, a connector is not required. When creating this type of sync task, you don't need to select a connector, but you do need to log in to Azure through SSW. The other settings and button functionalities are similar to those for Microsoft Active Directory. Currently, Microsoft Entra ID does not support the No Rotation mode, but it will be supported in the future.
- Login Azure Account
Click Login Azure Account to be redirected to the Microsoft Azure platform login page. Please log in using an administrator account that has read and write permissions for user accounts and accepts the Azure application's request permissions. After a successful login, you will be automatically redirected back to SSW.
- Click Add Sync User to add a user, and then click Save And Apply to save the settings. The functionalities of the buttons are the same as those for Microsoft Active Directory.
- After saving, the details page will look like this:
- Testing Button: This button can also be used to check the validity of the current Azure connection.
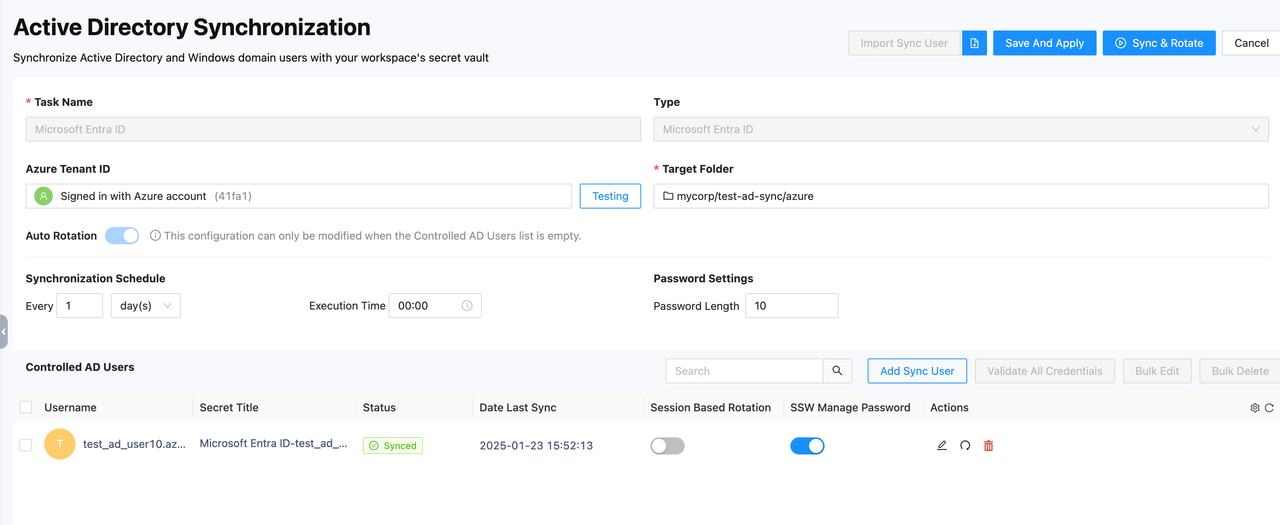
- Testing Button: This button can also be used to check the validity of the current Azure connection.
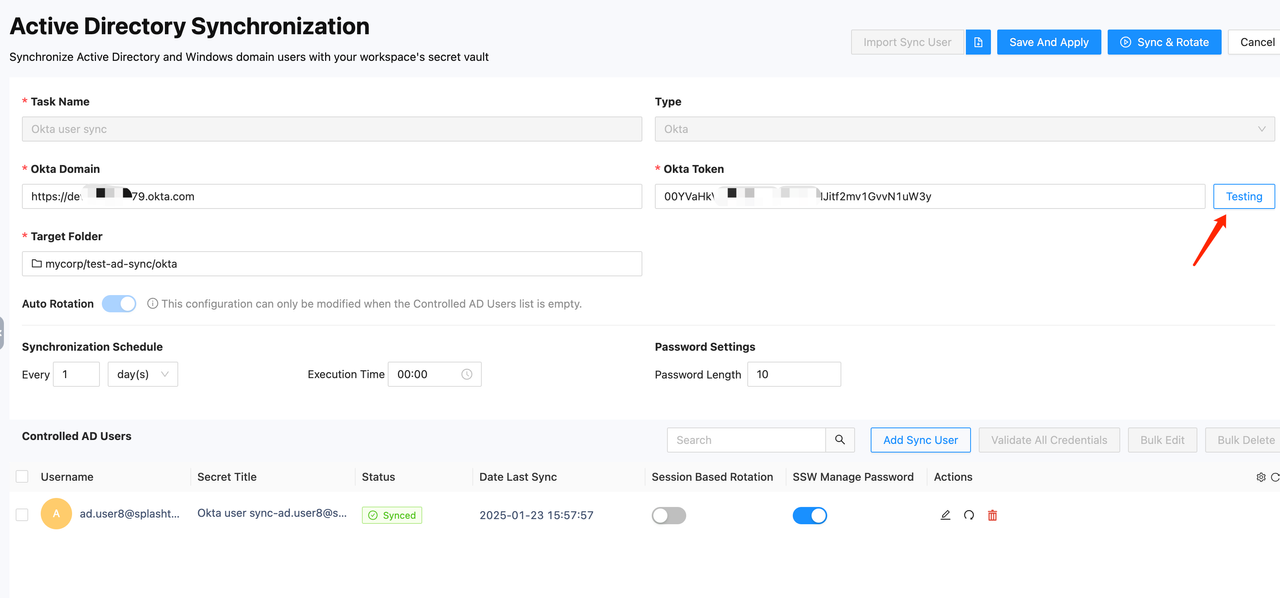
Okta
For Okta sync, a connector is not required. When creating this type of sync task, you don't need to select a connector. Instead, you need to configure the Okta tenant information. The other settings and button functionalities are similar to those for Microsoft Active Directory. Currently, Okta sync does not support the No Rotation mode, but it will be supported in the future.
- Okta Domain: Enter the domain name of your Okta account.
- Okta Token: Enter an API token with admin permissions. SSW will use this token to request Okta's open API to complete user sync and password rotation.
The method for adding users is similar to the one described above. After adding users, click Save And Apply to save the configuration.
The Testing button can be used to validate the entered Okta information.
Meanings of each column and button
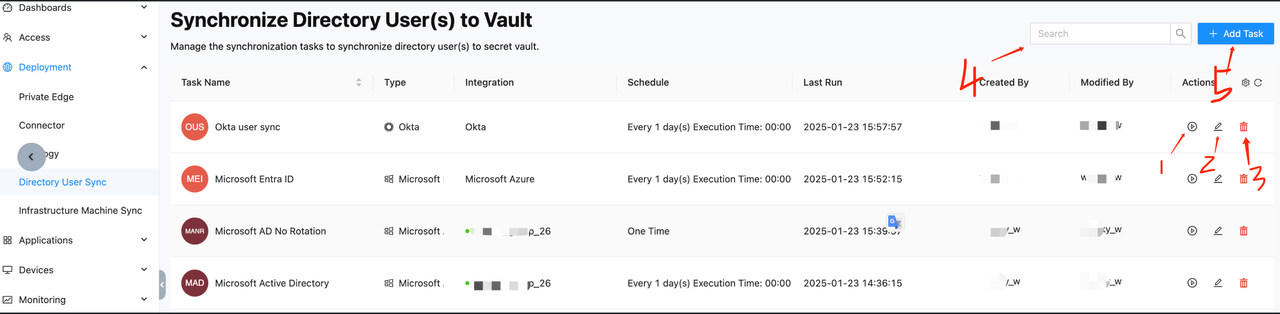
- Task Name: The name of the task set during creation. Task names must be unique and can be sorted by task name.
- Type: The type of task, which can be one of three types: Microsoft Active Directory, Microsoft Entra ID, or Okta.
- Integration: The integration type, which can be one of three types: {connector name} (for Windows), Microsoft Azure, or Okta.
- Schedule: The execution schedule of the task.
- Last Run: The last execution time of the task.
- Created By: The name of the person who created the task.
- Modified By: The name of the person who updated the task.
- Actions:
- Button 1: Manually trigger the rotation of all users under the current task.
- Button 2: Enter the task details page and edit the task.
- Button 3: Delete the task with two options:
- Remove from Sync: Only deletes the current task. All users in the task are released and can be reused by other sync tasks.
- Remove from Vault & Sync: Deletes the user's corresponding vault secret along with the task.
- Button 4: Search for tasks by task name.
- Button 5: Enter the Create Task page.
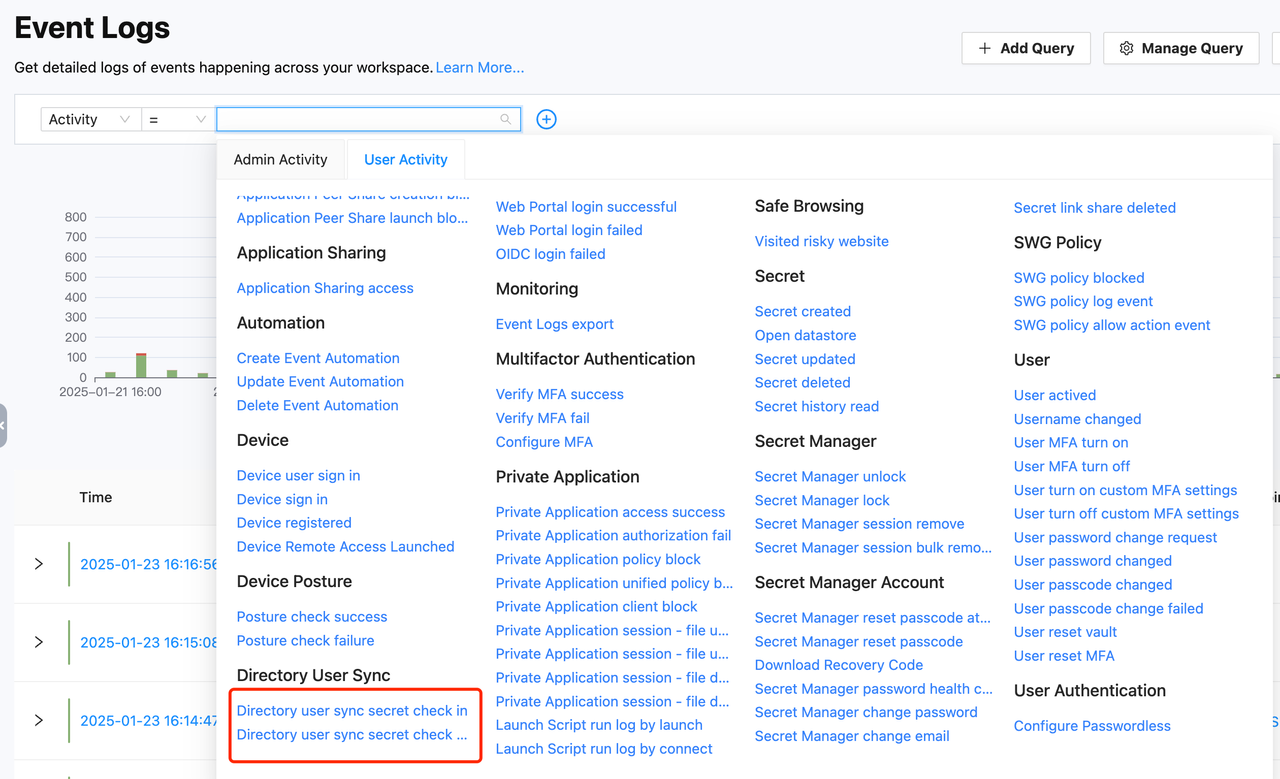
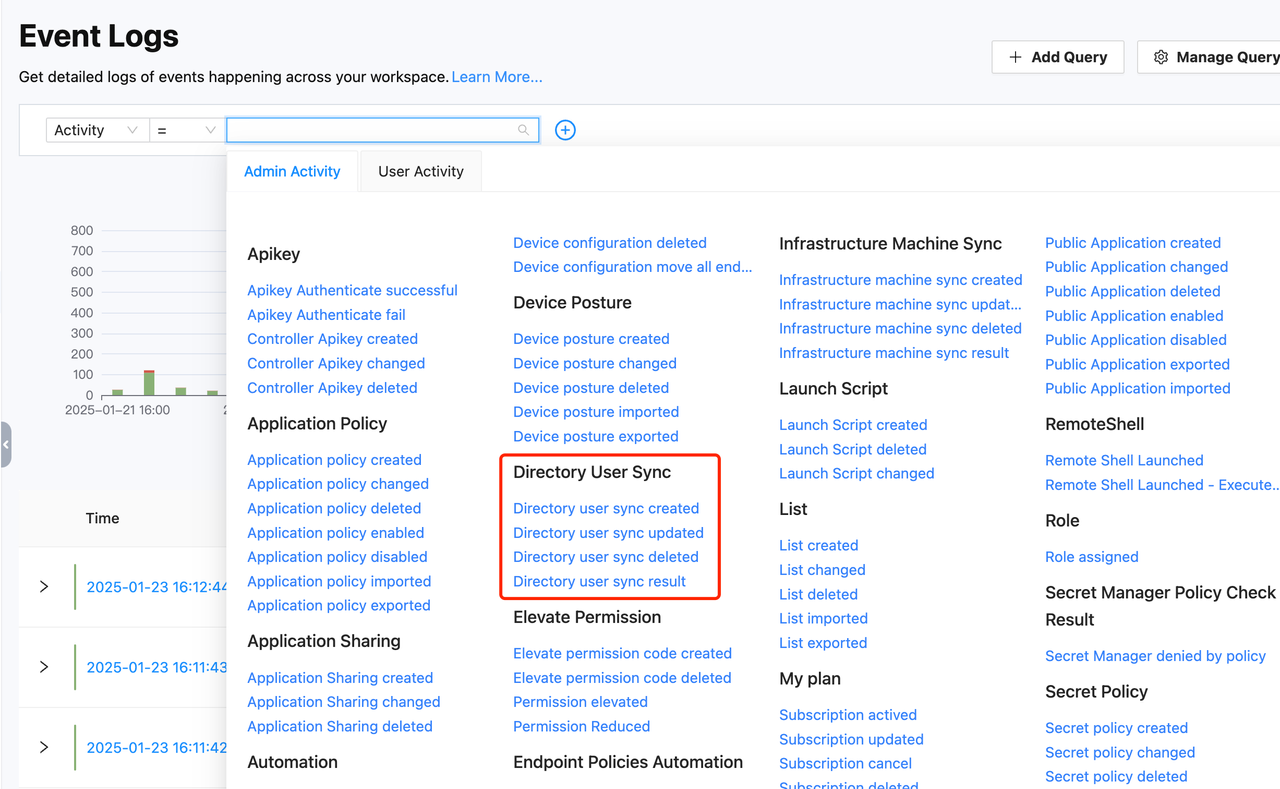
Event
- Admins can view events related to the creation, modification, and execution results of sync tasks in Monitoring -> Events.
- Directory user sync created: Event for creating a user sync task.
- Directory user sync updated: Event for updating a user sync task.
- Directory user sync deleted: Event for deleting a user sync task.
- Directory user sync result: Details of the results of scheduled or manual password rotation for user sync tasks.
- Both admin and regular user roles can view password checkout and checkin events.